Have you ever noticed how a fruity and tropical fragrance can instantly get you into relaxation mode? Well, Fruit Facials don’t just smell great but also do wonders for your skin!
Fruit Facials are packed with the goodness of Vitamins and Minerals along with active ingredients like Glycolic acid, Malic acid, Tartaric acid, Hydroxyl acid, Citric acid, Phenolic acid, etc. making them a popular choice among most people. Fruit facials have hydrating, detoxifying, anti-ageing, anti-fungal, calming and exfoliating properties that leave your skin feeling supple and revived on a cellular level.
Fruit Facials for Different Skin Types:
- Dry Skin: Roughness, flaking, dullness and irritated skin are some of the most common concerns among people with dry skin. Trying out a fruit facial rich in Vitamin B12 and H will hydrate and nourish your skin. Facials that use products infused with the goodness of Papaya, Avocado, Kiwi, Apple, Orange, Strawberry, Chocolate, Grapes, and Banana are beneficial for dry skin.
- Oily Skin: Open pores, blemishes, breakouts, and spots are common concerns among people with oily skin. Fruit facials rich in Vitamin C and A are known for their skin clearing and oil control benefits. Facials that use products enriched with the goodness of Orange, Yogurt, Pomegranate, Watermelon, Mango, Banana, Peach, etc. will be beneficial for people with oily skin.
- Normal Skin: Fruit Facials of all kinds usually work well with normal to combination skin.
We’ve all been in a situation where we are just too lazy to hit the Salon! Haven’t we? Here’s what you can do if you find yourself in such a fix:
-
Cleansing: Clean your skin thoroughly with a blend of raw milk and 2-3 drops of lemon juice to remove the dirt and dead-cell build up on your skin.
-
Skin Exfoliation: Mix 1 tbsp of oatmeal, 4-5 drops lemon juice and 7-8 tbsp rose water in a clean container. Massage this paste gently in upward circular motions for about 4-5 minutes and rinse it off. Add a few drops of milk to this mixture in case you have dry skin.
-
Steaming: This is an important step since it removes any residue of makeup and dirt from the surface of the skin and helps the fruit pack seep in and heal the skin. For this step, you can either use a face steamer or a hot compress.
-
Fruit Pack: Apply a nutrient rich fruit pack as per your skin type and relax for 15-20 minutes. We’ve curated a few DIY Fruit Face Masks for you to try out (below)!
It is also very important to know what to do, and more importantly what NOT to do after a Facial!

Some DIY Fruit Face Masks to try at home:
-
Nourishing Mask for Dry Skin: Mix one mashed banana with ½ tbsp honey, ½ tbsp milk, 1tbsp olive oil. Apply this paste to your face and neck for 15 minutes and rinse it off with cool water.
-
Deep Cleansing Mask for Oily Skin: Mix 1 tbsp orange peel powder with ½ tbsp yogurt and 3-4 drops of lemon juice. Apply this blend to your face and neck for 20 mins and rinse it off with room temperature water.
-
Calming Mask for Combination Skin: Peel 1 avocado and 1 kiwi and mash them together, then mix with 1 tbsp of honey and make a paste. Apply this pack to your face and neck for about 15 mins and rinse it off with cold water.
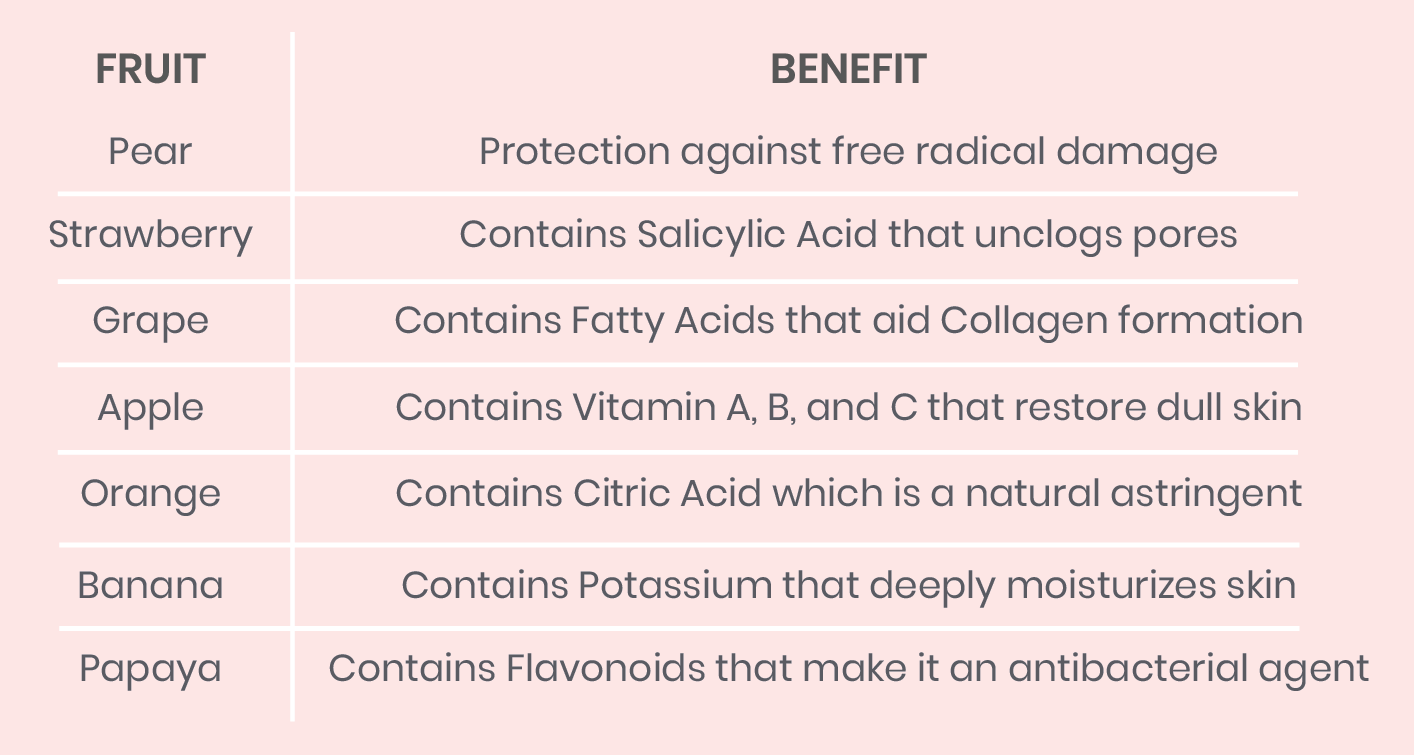
Here are the benefits of the diffferent types of fruit masks that you can use!
Lastly, you should never forget to cleanse, tone, and moisturize your face along with good nutrition and a healthy sleep cycle to maintain your skin texture. Another word of caution: always do a patch test in an inconspicuous area and wait for 24 hours before trying something new.
The cover image of this article was taken from: href='https://www.freepik.com/ photos/ background'> Background photo created by freepik - www.freepik.com